Sunday 29 July 2012

Cutting some ratchet wheels.

Apprentice here. This is my first official post to the blog, and I thought I'd share with you one of my more interesting - yet minor - undertakings here in the workshop.

A while back a chiming mantle clock that was recently serviced came in for repair. It seemed the customers couldn't wind it properly. After dismantling it, the problem was obvious; two of the ratchet wheels were damaged. One had broken off two teeth, and the other had bent teeth. I apologise for my lack of photographs... back then I hadn't thought to document it further for a blog post.

There is so much spring tension on these wheels, it is not entirely uncommon for them to be damaged, especially when broken mainsprings are involved.

After a bit of horological mathematics, the right P.P Thornton gear cutter and stock brass was ordered for the job.

Example ratchet wheel pictured here, not the one from the job.
Once I had all the parts I needed, the brass was faced off in the lathe and prepared for cutting in the milling machine. Everything had to be aligned and centred correctly, and the Z and Y axes fixed into place.

If you've followed the earlier posts, you'll know about the Sherline rotary device (which unfortunately I couldn't recall the name of, and is henceforth referred to as the 'little computery thing') which was used in the milling of the Breitling case-back opener. I set this up to have twenty divisions/rotations, and got to work cutting the teeth.

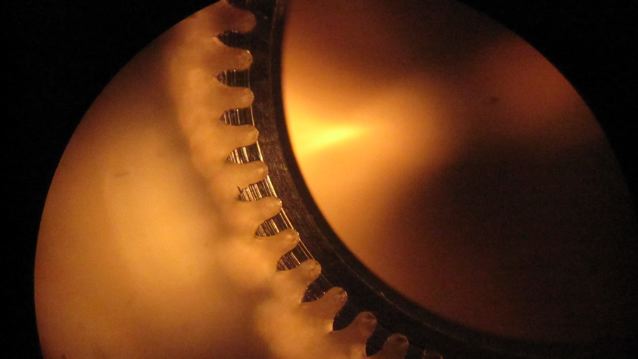
Snip snip. It's hard to get a good angle on this one, but I'm sure you get the idea of what's going on.
Little computery thing did its divisions, and all I really had to do was crank the X-axis of the milling machine back and forth till my arm felt like it was going to fall off, or at least until the divisions were complete.


After that, the brass was put into the lathe, drilled, and with a noise most terrible, the two ratchet wheels were parted off.

After and before.
So here are my wheels next to the old, damaged ones... you can clearly see how they would have been causing problems in the clock!


All that was left to do was the filing, greasing and fitting, and hopefully that clock lived happily ever after. Time will tell.(Get it? Clock puns. I'm simply a comedic genius.)
(I'm sorry.)

Till next time. Hopefully I'll have something a little more interesting, and more photos to boot! Perhaps I'll bother to slightly further my horology humour, but my hopes aren't high for that dead horse.

Bronte.

Thursday 26 July 2012

How did that happen?

Every now and then I get a watch in for repair and wonder how on earth it came to be in this particular state. In this case I received a year old Marathon automatic watch on my bench. Apparently it wasn't winding properly. "Hmm, ok, let's see.... oh, yes, I see what you mean. That doesn't feel good at all... right let's open her up and have a look inside." My train of thought went something like that.
So here's what i found once I pulled the automatic winding out to have a look at the manual wind component.


Can't see it?
Well it is pretty small. Have a really close look at the gold coloured wheel with the big screw head in the middle of it, just where it meets the steel wheel with the even bigger screw head. Still having trouble? Ok, let's use the microscope.


Ah, here we go. Four teeth completely gone, and the rest damaged.... So.....

HOW DID THAT HAPPEN?

Honestly, I have no idea. Customers ask me this sort of thing all the time. I point out damage to their watch, and they ask me how it happened. I don't know. But I do know how to fix it.

In this case, there was only one solution, and that was a full strip and clean of the watch, along with a replacement wheel.

WHY NOT JUST REPLACE THE BROKEN WHEEL?

Well you see, when a part comes off a wheel or lever or whatever, it tends to rattle around inside the watch until it can find the most amount of damage to do. I was kind of curious to see if I could find the missing teeth. I found two for sure. Here they are.


One stuck to the escape wheel.


And one (or maybe more) ground to dust under one of the reversing wheels in the auto winding system.

Once the strip and clean was done, it was all fairly simple. Put it on the regulator to check timing (which was bang on), case it up and water pressure test it.... Oh no wait, it wasn't quite, was it?

It is fairly common practice now for service centers to charge you for a new set of hands when they service your watch. Why?
Because they frequently get damaged during removal. In this case, the hour hand did not want to come off. It was so tight on it's wheel, that the hand started to peel off it's collet, bending itself in the process. In an ideal world, this collet would end above the level of the dial, so that any hand removal tool could grip under the collet, and pull it off cleanly. But this isn't an ideal world, and I could not get the tool under the collet. Rather, it pulled against the soft part of the hand and bent it. These hands hold vials of tritium gas which means they glow for 20 odd years without the need to collect any light first, so I had to be super careful not to damage them. Finding new ones could be very difficult. In the end I gave up trying to remove the hour hand, and just left it and it's wheel on the dial. Not ideal, but the best thing to do in the circumstances. I then had to line it up with the midnight date change when re-fitting it, and then straighten it, as the tip had ended up pointing up in the air. All this without doing any cosmetic damage to either hand or dial.

Well, it worked. This photo was taken after refitting.


Done.


All that remained was to test it and return it to it's happy owner, who asked me "It won't happen again will it?" To which I could only honestly reply "Dunno... I still don't know how it happened in the first place."


Thursday 19 July 2012

Valjoux 7750 Automatic Chronograph.

Hey everyone.

Here is the first of what I hope will be many interesting videos on watch related topics. In this video I walk you through the basics of how the Valjoux 7750 chronograph functions. This was recorded, uploaded and blogged today, so you know it's fresh!

I have a bunch of ideas on stuff to video, but I'm open to suggestion. If here's something you'd like to know about how watches work, and I can video it, then let me know, and I'll see what I can do.

This was shot in H-D so if you click on the 'watch it on youtube' icon it shows up better. Full screen seems a bit grainy.

Cheers,
Blair.


Wednesday 18 July 2012

Cracking a Breitling.

Some time ago a customer brought in a Breitling automatic chronograph for a service. If you are at all familiar with Breitling, you will know that the case back is designed specifically to make life difficult for anyone to remove without special tooling. I have a few ways of getting them off if they aren't cinched down too tight, but this one was extremely tight.

Breitling do not have an authorized service center in New Zealand. The customer didn't want it sent overseas, and frankly, I don't see why he should have to, so I said "Leave it with me...." and I got my thinking cap on. A bit of careful measuring, and a bit of light CAD, and I had a solution. This was going to be extremely time consuming, but I reasoned that I was bound to see a few more of this case-back, and the tool would be useful in the future...... So far I think it has only been used the once, but I do get to pull it out of the draw occasionally to show people... so that's nice. In retrospect I think I could have bought a whole set of aftermarket Breitling openers, but they're pretty darned expensive.

Anyway, I figured I could use the handle from my Rolex case opener and just make a fitting for it, so here is how I went about it. Breitling have an uneven number of flat steps around the case back, which makes it difficult to even measure accurately. I used the vernier caliper to measure around the outside of the steps. I then drew a circle of that diameter in CAD, divided that circle into five segments, drew lines joining the outside of each segment (creating a pentagon) and then drew another circle intersecting the middle of each side of the pentagon. This (hopefully) gave me the pitch circle for drilling the pin holes. Have I lost you yet? Luckily for me about the only bit of maths I was any good at was geometry. Something about being able to visualize it....


Test fitting... not quite there yet.

These stainless pins needed to have flats milled in them. It was really just a matter of taking a tiny bit at a time out, ane then re-checking.


So there we go. One Breitling chronograph opened to reveal a Valjoux 7750 movement, which was duly serviced and returned to a happy customer.

Cheers all.
Blair.

Tuesday 17 July 2012

Cutting a new Wheel for a Rolex.

Hi and welcome to the first of what will hopefully be many interesting posts on some of the more interesting jobs we do here at Watches on Broadway.


Recently I was asked to service a fairly old Rolex automatic wrist watch. This was a caliber 1066, which to be honest I hadn't seen before. There was one problem: One of the wheels in the automatic winding system had damaged or missing teeth.


Checking around my various suppliers, I couldn't find a suitable replacement, so I spoke to the customer about cutting a new wheel. I have cut quite a few wheels for clocks in the past, including making up a whole wheel, pinion, and arbor to replace one that was missing completely from a grandfather clock, but cutting something small enough for a watch was a new on on me and could prove to be quite interesting, so I agreed to do it for a fairly modest price.


The first part of the process is to count the teeth and measure the wheel to ascertain what size cutter to use. My calculations told me a .14 module cutter should be the closest fit, and a week later I had my new cutter from PP Thornton in England. It was considerably smaller than any other cutters in my collection, so the first machining job was actually to make a cutter arbor. Obviously this had to be absolutely exact, so after machining most of it in the lathe, I moved it to the milling machine to cut the seating for the cutter itself. I was very happy with the result of this. The cutter ran true with excellent repeatable accuracy. 


It would have been easiest to simply make a new wheel from scratch and just not cut any spokes. I'm sure this would have been perfectly adequate too, but a bit of professional pride made me want to preserve as much of the original wheel as possible. So the next machining job was to remove the broken teeth from the wheel. To do this I faced, drilled and reamed a piece of brass stock so the pinion was a tight press fit into this mandrel. I then fitted another brass blank machined to fit around the arbor, and clamped the wheel in place with a live center in the tail-stock ram. It was a fairly simple procedure to then remove as much wheel rim as required.


Cutting the actual teeth is always the interesting part in a job like this. I turned and bored a piece of brass stock in the lathe, before transferring the chuck to my computer controlled rotary table on the milling machine. This is a truly great bit of kit. I can cut any number of teeth I want with perfect accuracy. In this case it was 52 teeth, so that number was plugged into the key pad, and away we went. I'll spare you the details of exactly aligning the Y and Z axes of the mill to place the cutter in the right place. What I will say is that it took a couple of test pieces checked under the microscope before I got it perfect.


At this point, the wheel was removed from it's arbor and dropped into the recess I had bored in the wheel blank. The stock was held in the big bench vise and heat applied with a small gas torch. A wee bit of flux and solder later the wheel was soldered cleanly in place. Sorry I didn't get photos of this. The wheel was then re-mounted in the lathe and carefully parted off the stock. I stoned off the excess with a Degussit stone, cleaned it, remounted the wheel on it's arbor and fitted it up.


Needless to say, my customer was really happy to have his precious watch working again, and I was really happy to have made it happen!


I hope you enjoyed reading this as much as I enjoyed doing the work.


Until next time,
Blair.